♠ ♥ ♣ ♦

Additional Resource Links:
- Grouping and Hierarchy
- Simiotics
- Symbols and Meaning
- Symbols Impact on GD
- Symbols History
- Ancient Symbols
- Symbols
- 52 Types
- Box
- Grouping and Hierarchy Checklist
- Double-Sided Printing
- printing cards
Hierarchy and Priority Grouping are the main design focus of this assignment. Above all else, make the hierarchy clear and ordered through your visual system.
The primary focus of this assignment is your ability to create implied priority (hierarchy) and visual grouping of similar objects. Your assignment is not to create a game, but instead a deck of cards where multiple games might be played. Therefore, certain cards should appear to be worth more than others regardless of the game. This relative importance should be evident by the “look” of the cards themselves, it should not require an explanation nor an understanding of the theme to make this relationship understood. Reinforce any form of hierarchy by indicating that order through at least three ways. For example, if you use relative size as one way to indicate hierarchy, you might also reinforce this by also applying value (lightness to darkness) and amount of detail across the group as two more ways.
Use this as a checklist to determine if you are meeting the Grouping and Hierarchy requirements with your design. You must turn this grouping and hierarchy checklist in with your final design.
Thematic unity is a secondary focus of this assignment. Base your set of cards around a theme which can be extended through various levels of implied importance and similarity grouping. Look for similarities as well as differences among characters/roles, objects or events to draw inspiration from. Are there any “good guys” and “bad guys” that come from your theme? If so, this would be an example of how to begin grouping. (don’t worry if there are no good or bad guys in your theme, simply look for other ways to group). Your theme is only to provide you with inspiration and be a source of imagery. This theme may or may not have a strong sense of hierarchy already built in to it. If there is, you can use this to your advantage. It should not be necessary for someone else to know your theme to be able to distinguish the grouping and hierarchy, however. Instead, grouping and hierarchy must be indicated visually, by how you render the images and symbols. What those images and symbols are come from your theme, and it is natural that you would utilize the hierarchy and grouping that is already built into that theme. The difference here is that this thematic grouping and hierarchy is secondary to what you do visually.

Assignment Requirements:
- design a deck of playing cards based upon either one of the following criteria:
- an existing set of cards (ex.—torot cards)
- a story or myth (ex.—Aesop’s Fables, nursery rhymes, movie or TV series, etc.)
- Research: color theory gestalt theory of grouping symbols and icons, dingbats and historical typographic symbols and punction marks various cultural imagery and symbolic communication
- Use symbolic color
- Use figure/ground relationships
- Your solution must visually communicate the concepts of: heirarchy/priority order order/grouping symbolism
- The total number of cards is up to you
- Size, and shape of the cards are up to you.
- Remember you are not creating a game, but instead, a system with which any number of games could be played.
- Design the back of the cards utilizing non-critical registration.
- Create a custom sized “box” or container for your cards
Process:
- Read thoroughly all information found on the Resource Links provided to you at the top of this assignment page.
- Pick a theme to base the look of your cards
- “Chart” the characters in your theme. This is to visually organize and determine the number of suits and number of cards in each as well as which characters belong together (suit/group) and which characters are more or less important/power (hierarchy).
- List at least three methods you plan to use to visually indicate grouping (Color, symbol, amount of detail, posture, shape, pattern, etc.) Another person must be able to discern these different groups even if they do not know your theme.
- List at least three methods which you plan to use to visually indicate hierarchy (size, position, posture, symbols, number of symbols, value, border treatment, style etc.) Another person must be able to discern these levels of hierarchy even if they do not know your theme.
- Remember there are three main areas that you can use to determine or create visual hierarchy:
- use of symbols (universal meaning, not necessarily thematic)
- choice of object (usually thematic)
- how you draw the object
- Test your plan for indicating visual grouping and hierarchy by creating a top and bottom card for each suit.
- Make prototypes for all cards
- Use the following references to guide your process.
Card Back:
- Design the back of the cards utilizing non-critical registration. This generally means that the design on the backs should not come close to the edges of the cards unless it is a repeating pattern of smaller shapes. If it is a design made up of a larger central image, it must be scaled down in size so that there is at least 5/8″ from the edge on all sides.
Card Box:
- Create a custom sized “box” or container for your cards. This box must be made and sized according to the size and number of your deck of cards. You can determine the thickness that the box should be by stacking up the same number of pieces of paper as the number of cards in your deck. Measure the height of this stack of paper and that should be the thickness of your box. You must use the same paper as that which your cards will be printed on and you must be careful/precise in your measurements. (to the 32nd of an inch at least).
Printing:
Go to these links for step -by-step instructions for printing
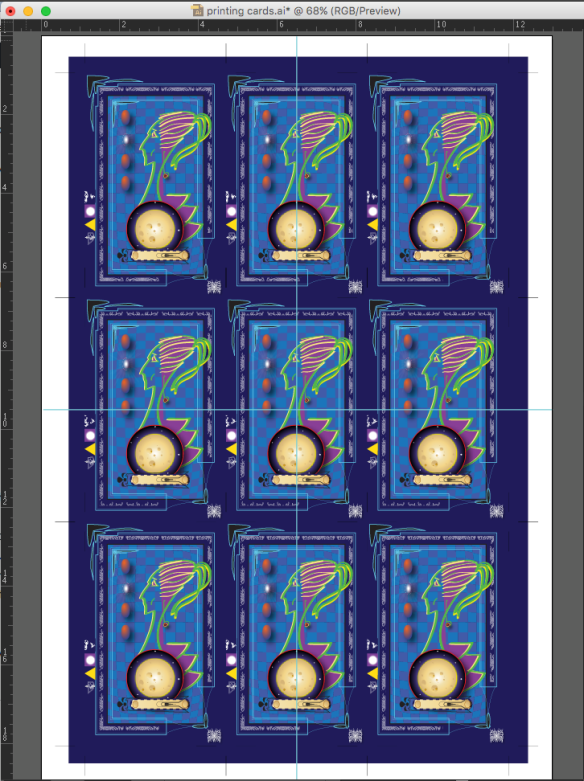
Refer to this layout as an example of ganging together multiple cards for printing. (In this example, all the cards are the same design, it does not show any grouping or hierarchy. it only shows how multiple cards should be arranged with bleed and crop marks for printing purposes).

- 1st, create an art board the size of the paper you will be printing to.
- Show Rulers from View in the main menu and pull out a vertical and horizontal guides from them. Using the rulers to locate them, align these guides exactly on the middle of your page, horizontally and vertically. Zoom in as far as you can to be precise in this step. Lock Guides from the View menu when finished.
- In Illustrator, create crop marks for individual cards by first selecting the main rectangle and then under Effect, select Crop Marks.
- Then create the bleed area for the card and group the bleed and card (including crops) together.
- Do the same steps for all cards, space them equally from each other (use the align command to do this) and group all of them together.
- Be sure to exactly center the total group of cards on the paper to allow registration (alignment) of the design on the back side (be sure to exactly center the backside design as well)). (Use the guides you created earlier to do this.)
- After ganging together the front sides,
- flatten layers
- confirm your document is in RGB if printing to an Epson inkjet printer
- save the file and call it “Cards Front Print”. Then, immediately do a second “save as” command and call that one “Cards Back Print”. This will keep your guides in exactly the same location.
- Place your backside design in a new layer exactly on top of the card fronts. When the backs are in position you can delete the front side design layer (including the front designs) from this file. This will leave the back design perfectly in position.
- Cutting with Crops do not use the paper cutter
- Cut only from crop mark to crop mark, NOT all the way across the sheet of paper or you will loose the crop marks for the other cuts.
Some Previous Student Examples:
- BREAKING BAD—Jordan Ritz
- MUSIC HISTORY—Sharon Su
- TOWN/COUNTRY—Joanne Kwan
- FLOWERS—Joanna Duong
- DECKADENT DESSERTS—Katie Nimmo
- COMING TO AMERICA—Gabe Babaoye
- Vanessa Lau
- UNIVERSE—Brittany Maag
- Bernice Calvario
- Sheng Moua
- MATRIX—Becca Wyant
- CELTIC MYTHOLOGY—Alex McBride
- WALKING DEAD—Danielle Thomasson
- SIDESHOW—Sarah Lewis
- LIFE—Tricia Juanitas
- TROLLS—Julia Nguyen
- TOWN/COUNTRY—Joanne Kwan
- Angela Chang
- PLANETS—Emilie Jenkins
- INDIAN CASTE—Wes Oswald
- ORCHESTRA—Sharon Su
- VINTAGE—Jon Sanchez
- AZTECA—Carmen Cobain
- INDIAN CASTE—Wes Oswald
- REVENGE—Dana Shiroma
- TOY STORY—Ashley Johnson
- THE DEADLIEST GAME
- GAME OF THRONES—Monica Odeh
- COMING TO AMERICA— Gabe Babaoye
- THE CLOUT—Dreyk Aristigui
- GAME OF THRONES—Monica Odeh
- MATRIX—Becca Wyant
- BASEBALL—Adriana Flores
- TOY STORY—Marc Tom
- DECKADENT DESSERTS—Katie Nimmo
- Janice Kwan
- FISH—Ashley Richards
- DECKADENT DESSERTS—Katie Nimmo
- APACALYPSE—Mark Rodreguiz
- Sheng Moua
- Camila Carvajal
- WALKING DEAD—Danielle Thomasson
- Shay Jones
- STEAMPUNK
- GAME OF THRONES—Monica Odeh
- Bernice Calvario
- THE LAST GAME—Tony Condello
- DAY IN THE LIFE—Alexander Zaworski
- CHAKRA—Viktoria Tomas
- TOY STORY—Ashley Johnson
- JESTERS—Marie Claire
- CIRCUS—Joana Milidiu


